
I hope everyone had a great holiday season. I’ve been off for the last week and enjoying a bit of a break (although I have to admit that I did do some work anyway since I’m a complete workaholic). I have a 14 and a 10-year-old at home. The youngest has been playing Terraria recently. A friend of ours had been hosting a private server for him but it had to go away so I recently started hosting it on the same server I run Signal-Chief on.
Life was fine and dandy until this morning my oldest came to me asking about a Minecraft server that they could use. I really didn’t want to host another game on my server, but I also didn’t want to pay for another server to run all the time when they would only be using it for a little bit at a time. I played with the idea of just running a VM on my stack at the house but it’s not something I like to do, and they have a friend in England that they wanted to play with (ya I could port forward, but I really don’t like letting things into my home network). So I started to do some brainstorming.
I wanted to put them on a dedicated server, but one that wouldn’t be running all the time. At the same time though, I really didn’t want them to have to log into AWS to turn it on, and I sure as hell don’t trust them to turn it off when they are done. I started to look around and came across this blog post by a guy that stood up a Minecraft server that could be controlled simply by emailing AWS and then it would auto-shutdown after a period of time. I figured that following the blog would be pretty straightforward, and while it was for the most part, there were some holes in it. So I figured I would write a post of my own, and try and fill in those holes.
The Server
My first goal was just to get the server itself up and running in a functional state. I’ve stood up plenty of servers on AWS, and played with Minecraft a little bit before trying to help my oldest getting it running locally on their computer.
Standing Up The Server
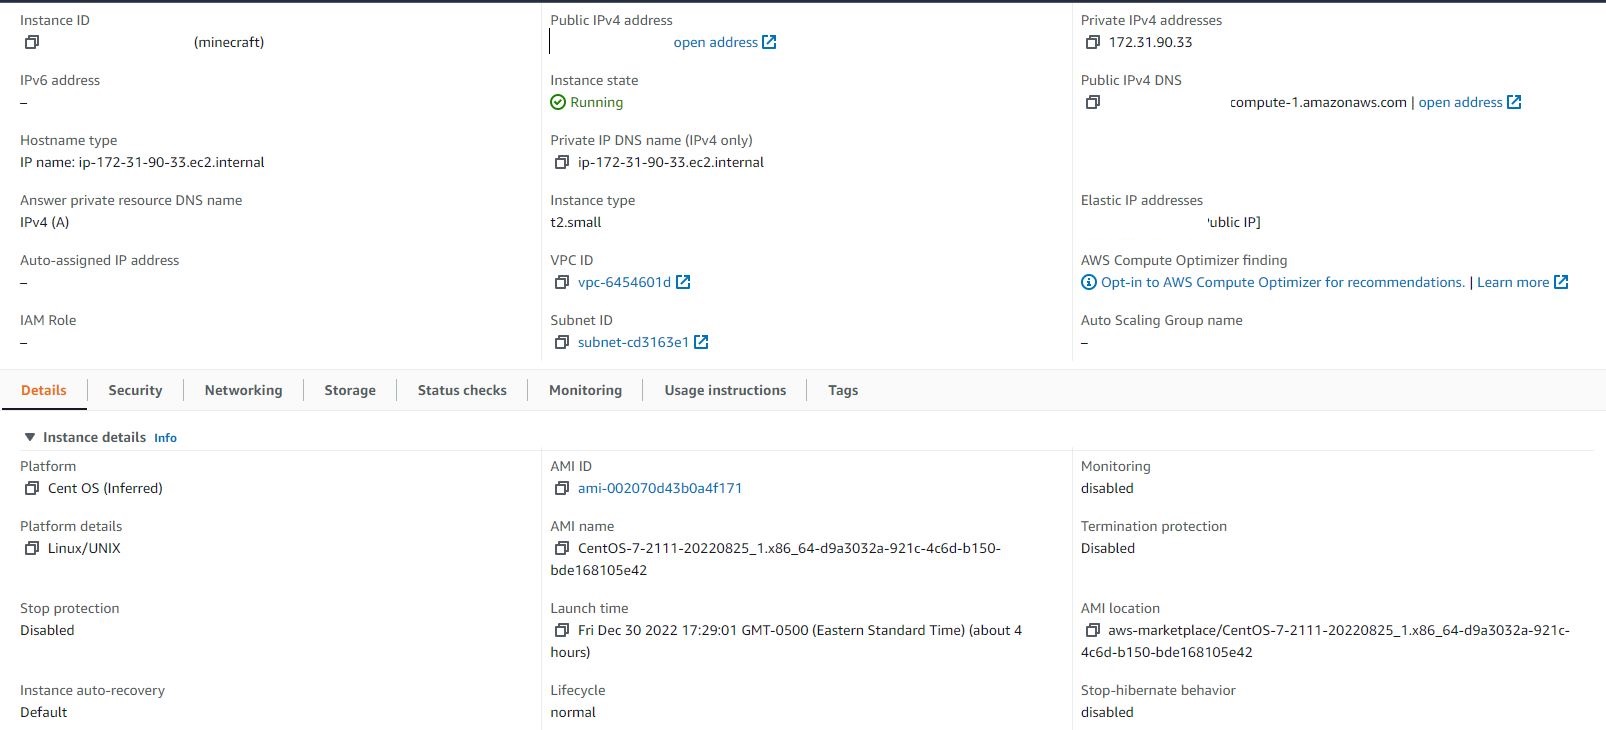
I won’t go into details about standing up the actual EC2 instance on AWS (there are plenty of blogs out there on how to do that) but TL;DR to say that I stood up a t2.small instance and assigned it a static IP address. The server is running Centos 7 (yes I still use it all the time). Make sure you open up TCP port 25565 into your instance so that the game can connect.
Once the “physical” server was up and running, it was time to get the Minecraft part of all of this working. My kid wanted a server that they could run mods on which when I started this, I didn’t realize that meant not the normal version of Minecraft server and instead a version from Minecraft Forge. Of course, I didn’t realize this until I had a fully functioning server up and running which I will save you the hassle of reading about since it’s fairly well documented already.
I won’t walk you through step-by-step on getting Minecraft Forge installed (again, there are plenty of blog posts about that), but below you’ll see the command sequence I used. It should be pretty self-explanatory.
yum update -y
yum install -y wget java-1.8.0-openjdk
wget https://download.oracle.com/java/19/latest/jdk-19_linux-x64_bin.rpm
useradd -r -m -U -d /opt/minecraft -s /bin/bash minecraft
mkdir -p /opt/minecraft/server
wget https://maven.minecraftforge.net/net/minecraftforge/forge/1.12.2-14.23.5.2860/forge-1.12.2-14.23.5.2860-installer.jar
java -jar forge-1.12.2-14.23.5.2860-installer.jar --installServer
Before I continue, two quick things. First, I didn’t want to screw around with SELinux on this because I’m not very good with it and I didn’t have the patience (maybe I’ll fix that later), so I disabled it. Second, you’ll notice that I’m installing Java 8. Java 8 was released in March 2014 and ended “premier support” in March 22, although it is still under extended support until 2030. Currently, Java 17 is the latest LTS release but Forge version 1.12.2 (which my kid insists on using even though it’s relatively dated because their mods work on it) requires Java 8. I don’t personally love the idea of using such old software on a production server, but I figure given that the server doesn’t do anything else, and it will only be on selectively, I’ve mitigated risk some. That being said, if you’re doing this on a different type of server, consider your risks.
Once you’ve done that, you can start the server (or at least try to) using the command java -Xmx1024M -Xms1024M -jar forge-1.12.2-14.23.5.2860.jar nogui. It will fail. Once it does, go into the eula.txt file and change it to true to agree to the EULA (I have no idea why they did it that way). While you’re also at this point, go into the server.properties file and change the value of gamemode to 1 (Creative) which is required to allow the use of mods.
Once that is done, run the same java command again and the server should start up. It will take it a couple of minutes to generate the world but eventually, it will finish up. Right now my goal was just to make sure that the stupid server was working. I had my kid sign on, and yes it worked.
Adding Mods
Most of the mods that they wanted came from a site called CurseForge. I attempted to just use wget to download them but that didn’t work with all of their adds and crap so I found the easiest way to get them was to download them onto my computer, SCP them onto the server with the Centos account (the default user account with SSH privileges for the AMI on AWS), and then to move them into the proper folder (/opt/minecraft/server/mods). When you are done downloading the mods, restart the server and then have the kid confirm again that its working properly.
Creating the Service
The last thing I needed to do for right now on the actual server was make sure that Minecraft started automagically when the server booted. The easiest way to do that in my opinion was just to create a service for it. To create the service, I put the following into a new file located at /etc/systemd/system/minecraft.service.
[Service]
User=minecraft
Nice=1
KillMode=none
SuccessExitStatus=0 1
ProtectHome=true
ProtectSystem=full
PrivateDevices=true
NoNewPrivileges=true
WorkingDirectory=/opt/minecraft/server
ExecStart=/usr/bin/java -Xmx1024M -Xms1024M -jar forge-1.12.2-14.23.5.2860.jar nogui
[Install]
WantedBy=multi-user.target
I started the service, checked the status….and it failed. I started to look through the journal output and noticed something about permissions. Oh ya, duh. I’ve been doing pretty much everything as root up until now, and the service ran as the minecraft user. Easy fix.
chown -R minecraft:minecraft /opt/minecraft/
Restart the service, and it looks good. Have the kid verify, and it’s good. Time to open a beer.
AWS
So now I had a functioning server running on AWS where my kid and their friend in England could both get to it and play. I however, didn’t want to pay the bill to keep it running 24/7/365, so the goal was to get it so that AWS would autostart/stop the instance based on an email or time. The original blog post I reference above made this seem fairly straight forward, but I ended up doing a lot of discovery learning. I’m unsure if the original author had already done some of the required steps before which is why he didn’t talk about them here, but I sure as hell hadn’t.
Lambda
The first step to making this work was using AWS Lambda functions to start and stop the server. As described by the AWS documentation, “with AWS Lambda, you can run code without provisioning or managing servers. You pay only for the compute time that you consume—there’s no charge when your code isn’t running.” This is great because it gives me a place to run code, and I’m only paying for it for the fraction of a second that it takes to run. Also with AWS’s free tier, given how little these functions were doing, I should stay under the free limit.
I ended up making three different Node.js 14.x functions. The first one to start the server on demand, the 2nd to stop the server on demand, and the 3rd to stop the server after a period of time (I’m doing 6 hours). The code for each function is below:
//index.js file to start the server on demand
const AWS = require("aws-sdk");
var ec2 = new AWS.EC2();

exports.handler = async (event) => {
  try {
    var result;
    var params = {
      InstanceIds: [process.env.INSTANCE_ID],
    };
    var data = await ec2.startInstances(params).promise();
    result = "instance started"

    const response = {
      statusCode: 200,
      body: result,
    };
    return response;
  } catch (error) {
    console.error(error);
    const response = {
      statusCode: 500,
      body: "error during script",
    };
    return response;
  }
};
//index.js file to stop the server on demand
const AWS = require("aws-sdk");
var ec2 = new AWS.EC2();

exports.handler = async (event) => {
  try {
    var result;
    var params = {
      InstanceIds: [process.env.INSTANCE_ID],
    };
    var data = await ec2.stopInstances(params).promise();
    result = "instance stopped"

    const response = {
      statusCode: 200,
      body: result,
    };
    return response;
  } catch (error) {
    console.error(error);
    const response = {
      statusCode: 500,
      body: "error during script",
    };
    return response;
  }
};
//index.js file to stop the server based on time
const AWS = require("aws-sdk");
var ec2 = new AWS.EC2();

exports.handler = async (event) => {
  try {
    var result;
    var params = {
      InstanceIds: [process.env.INSTANCE_ID],
    };
    var data = await ec2.describeInstances(params).promise();
    var instance = data.Reservations[0].Instances[0];

    if (instance.State.Name !== "stopped") {
      var launch_time = new Date(instance.LaunchTime);
      var today = new Date();
      result = "instance running";
      if ((today - launch_time) / 3600000 > process.env.MAX_HOURS) {
        console.log("stopping the instance...");
        var stop_data = await ec2.stopInstances(params).promise();
        result = "instance stopped";
      }
    } else {
      result = "instance not running";
    }
    const response = {
      statusCode: 200,
      body: result,
    };
    return response;
  } catch (error) {
    console.error(error);
    const response = {
      statusCode: 500,
      body: "error during script",
    };
    return response;
  }
};

The first two files simply use the AWS APK and force the EC2 instance on or off depending on the function. The third function looks at what time the instance started (assuming it’s running), and figures out if it’s been at least 6 hours. If it has, then it turns it off. For all three of them, you need to go into the function’s Configuration and setup and Environment Variable called “INSTANCE_ID” and set it to the value of your instance. The third function also had a second variable called “MAX_HOURS” where you set the number of hours to wait until you force the server off.
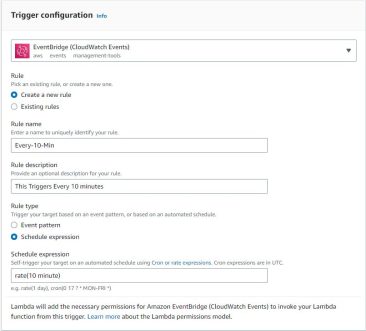
For the 3rd function (shutdown after x hours), I needed to build a trigger to make sure it would run and actually check to see how long it had been running. I wanted the function to run every 10 minutes. To do this, under the functions “Configuration” page, click on “Triggers”, and then “Add Trigger”. Select “EventBridge” and “Create a New Rule”. Give it a name and description, and under “Schedule Expression” set it to rate(10 minutes).
Note: The screenshot to the left shows the word “minute” without the ‘s’ at the end. Apparently, it’s important to include the ‘s’ like I did in the text above.
Now it was time to give each of these functions a test. Within each function, if you go to the “Test” tab, you can run an on-demand test. It lets you feed it JSON data, but there’s no need to with these functions so just hit the “Test” button. Unfortunately, when I did that and examined the output, all three of them had failed. Well crap!
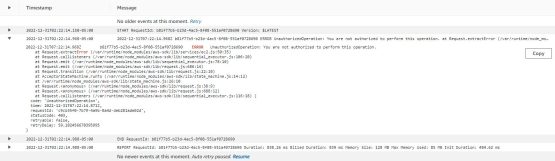
OK, so I see the part about not having authorization to do this. I forgot, the Lambda functions need to have permission to manage the EC2 instances. I jump over to IAM and create a new policy that gives permission to start and stop instances as well as “describe” them (find out what time it started at.). You can see the policy below:
{
    "Version": "2012-10-17",
    "Statement": [
        {
            "Sid": "VisualEditor0",
            "Effect": "Allow",
            "Action": [
                "ec2:DescribeInstances",
                "ec2:StartInstances",
                "ec2:StopInstances"
            ],
            "Resource": "*"
        }
    ]
}
Attach my new policy to each of the instances, and we’re in business.
Simple Email Service (SES)
The original blog post talked about using Simple Email Service (SES) to trigger the email functions to start/stop the server. I have to admit that until this moment, I’d never even heard of SES and had no idea what the hell it was. The blog made this sound like it was pretty straight forward….it wasn’t. I won’t describe the discovery learning I did, because there was a ton of it and a lot of trial and error. Instead, I will try the best I can to give you some clean directions.
I use GoDaddy as my DNS provider. It mostly goes back to the fact that when I first stood up Signal-Chief, not only was I registered through them, but I was also hosting on them too (AWS wasn’t as big then). I honestly had no idea what I was thinking as far as what email address I would send messages to. I hadn’t really thought about it. Eventually, I realized I needed produce an email address for a domain that I owned. I didn’t want to use Signal-Chief, but I have several other domains that I have parked for various reasons. I decided to grab one of them that isn’t used for anything currently and put it into use.
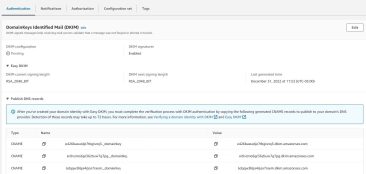
Before you can use it with SES, you must verify it. To do that, you must have DKIM configured, which is not something I had ever done before. Fortunately, AWS made it pretty easy. Go into SES and click on “Verified Identities” and create a new one. Under “Verifying Your Domain”, click on “Easy DKIM” and then “RSA_2048_BIT”. It creates the DKIM keys required and then gives you the CNAM records you need to add to your DNS registration. Wait a little bit of time, and eventually AWS will see the updates to DNS and consider the address to be verified.
Now to configure SES to do something with the emails. Within SES, click on “Email Receiving”. Click on “Create Rule Set” and give it a name. Now click on “Create Rule”, give it a name and ensure that “Status” is enabled. Add a new “Recipient Condition”. I set an email address for the On script to fire. Under “Add Actions”, pick “Invoke AWS Lambda Function” and select the appropriate function. Click next. Once it’s done, it will automatically create the IAM rule required. Do the same thing again, with a new email address, for the off condition.
And that’s it. Send an email or two and verify that things turn on and off as they should. Realize that it takes a couple of minutes for the function to fire and then EC2 to complete the action (I told my kid to wait 5 minutes). Happy gaming.
Credits
- box-headed_Minecraft_men: Doug Kline | CC BY-SA 2.0 Generic
Pretty awesome. Have you stayed under the free tier?
They don’t use it a ton (part of why I wanted this setup) but ya, just looking at the billing it looks like it has.
Great post! I learned something about Lambda functions that will help me in other areas… Not necessarily running a Minecraft server.