
This post is probably going to be updated a few times as it’s a work in progress as I figure things out. As I’ve noted before a few times, I like to write things out as I figure them out so that I don’t have to research time and again. Today’s project, replacing a pfSense firewall with a Centos server and Firewalld.
So why the change? I’ve been running a pfSense firewall for a while not but have never really loved it. I personally am not a big fan of Free BSD (what pfSense is built on), and it’s not the most intuitive thing in the world to configure.
My requirements:
- NAT the systems on the back-end (Complete)
- Act as a DNS forwarder for internal systems (Complete)
- Allow only a few specific ports in (Pending)
- Statically forward those ports to a system on the internal network (Complete)
- Log all inbound connections (Pending)
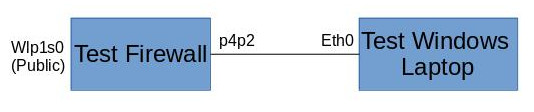
Above is a really bad sketch of my test network. I am using my normal laptop running Centos as the test firewall. Wlp1s0 is the wireless card that I am using to connect to my existing home network. p4p2 (don’t ask me why it’s named that) is the Ethernet port that is going to be acting as my internal network interface, and I have my wife’s laptop connected for the test internal device.
Step 1: Configure Interface
First step was configuring the internal interface. For my test network I was using the 10.0.0.0/24 network as the internal network with .1 being the “firewall” and .2 being the test laptop. Here is the configuration for LAN interface. You can see the IP address and subnet mask. You can also see that I have assigned the interface to the internal firewall zone.
TYPE=Ethernet
BOOTPROTO=none
DEFROUTE=no
IPV4_FAILURE_FATAL=no
NAME=p4p2
DEVICE=p4p2
ONBOOT=yes
PROXY_METHOD=none
BROWSER_ONLY=no
IPADDR=10.0.0.1
PREFIX=24
ZONE=internal
For the Windows laptop, I just went into network config and set the IP address to 10.0.0.2/24 and used 10.0.0.1 as the default gateway.
Step 2: Enable IP Forwarding
The next thing you have to do is enable IP forwarding to allow the traffic to transit the wireless “WAN” interface to the “LAN” interface. The second line is to put the configuration into the ip_forward.conf file so that it continues to work after a reboot.
sysctl -w net.ipv4.ip_forward=1
echo "net.ipv4.ip_forward = 1" >> /etc/sysctl.d/ip_forward.conf
Step 3: Enable NATing
Now we need to enable NAT
firewall-cmd --permanent --direct --passthrough ipv4 -t nat -I POSTROUTING -o wlp1s0 -j MASQUERADE -s 10.0.0.0/24
firewall-cmd --reload
After this, I went onto the Windows laptop and did a simple ping to Google to confirm that the NATing was working….it did.
Note: After finishing this part of the post and doing more research I found a native firewalld command that would work without having to use the –direct command which is what I am using now. I found this, and a lot of other stuff in a Red Hat Guide.
firewall-cmd --zone="public" --add-masqueradeStep 4: Static Port Forwarding
I want to make sure that incoming port 80 and 443 ports are able to come into this network to connect to a web server that I am running. My goal was to use native firewalld commands and I managed to figure it out. Note in my example, I am forwarding 80 and 443 to 8000 and 4430 so that the web server can run as a non-root process.
firewall-cmd --zone="public" --add-forward-port=port=80:proto=tcp:toport=8000:toaddr=10.0.0.2
firewall-cmd --zone="public" --add-forward-port=port=443:proto=tcp:toport=4430:toaddr=10.0.0.2
Step 5: DNS Resolving
There are actually a couple of different parts to this. First obviously it needs to be able to act as a DNS server. But also it needs to be able to do DNS over HTTPS. Reason being, I don’t like to help my ISP make any more money they they already do. Part of their income stream comes from selling to whoever they want my DNS history. By using DNS over HTTPS, my DNS traffic is now encrypted and completely invisible to the ISP and anyone else who might be wanting to take a look.
Cloudflare recently opened up their DNS server to support this. Combined with the fact that they only keep their logs for 24 hours, it sounds like a winner to me. In order to support this, you need a server that supports this. dnscrypt-proxy is designed as a client, but with a little modification can be used as a server as well. In order to get it working, I make the following changes to the config file (dnscrypt-proxy.toml) Line 53 change the listen_addresses to my internal IP address. Line 188 change to 1.1.1.1 to use Cloudflare. Uncomment line 313 to enable logging