
This is likely the first in what will be a series of posts documenting me setting up a new development environment. I’ve been doing dev work for years but have never taken the time to document how I like my setup which means every time I do it again, I have to figure it all out again. As a general rule, all of my computers are Windows systems. There are a number of reasons for this, that I won’t go into right now but if you have done any dev work, you know Windows isn’t the friendliest system to do a lot of things on. Because of that, I always run a virtual machine with Centos on it as my actual development host. I won’t go into creating a VM (I really hope you know how to do that), but instead what I want to focus on today is being able to connect to that VM easily in the future.
I am running my VMs on VMWare Workstation Pro. I have my hosts connected to a VMNet running NAT with a network address of 192.168.30.0/24. By default, VMWare is running a DHCP server that will automatically give each system an IP address. That works great most of the time, but for this particular box, I will be connecting to it frequently, and trying to figure out the IP address that it has today is a maddening exercise that I get really tired of. So, static IP address it is. I won’t go into the details of configuring a static IP address but for my dev box, I have it set to 192.168.30.10.
Hosts File
I prefer to connect to my development system using a DNS hostname instead of an IP address for a couple of reasons. First, it’s a lot easier to remember the name (in my case dev.local) instead of the IP address…I mean that’s the reason why we have DNS in the first place. Second, before I got smart and started to use a static IP address, I would have SSH certificate issues if my IP address changed.
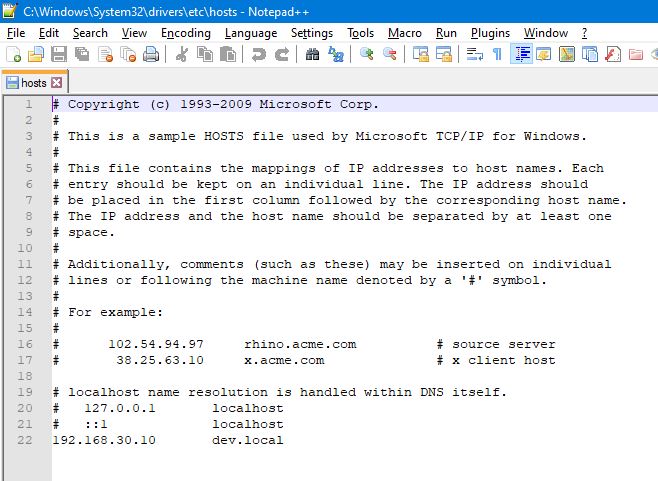
I could set up a DNS entry on my home router but that seems a bit overkill and a pain in the butt. Instead, I use the Windows HOSTS file. If you aren’t familiar with the HOSTS file, it is very similar to the /etc/hosts file in Linux. It statically maps a name to an IP address and takes priority over any address that a DNS server may reply with. In Windows 10, the HOSTS file is located at c:\windows\system32\drivers\etc\hosts. When you open the file, it gives you the example format but it is a simple space-separated list of the IP address followed by the hostname.
SSH Authentication
If you don’t have an SSH key generated, it is essential unless you just like typing in passwords. Generating the key on a Windows system is pretty straightforward. Open a command prompt and enter the command:
ssh-keygen -t ed25519
This will generate both the public and private keys needed to access a remote system. I generally use Putty as my terminal of choice for SSH access from my Windows system. Unfortunately, Putty doesn’t accept the default key format that we just created, so we have to convert it. Open Putty Generator and select Load. Navigate to the private key that was just generated and then save the Private key so that you have it in the correct format.
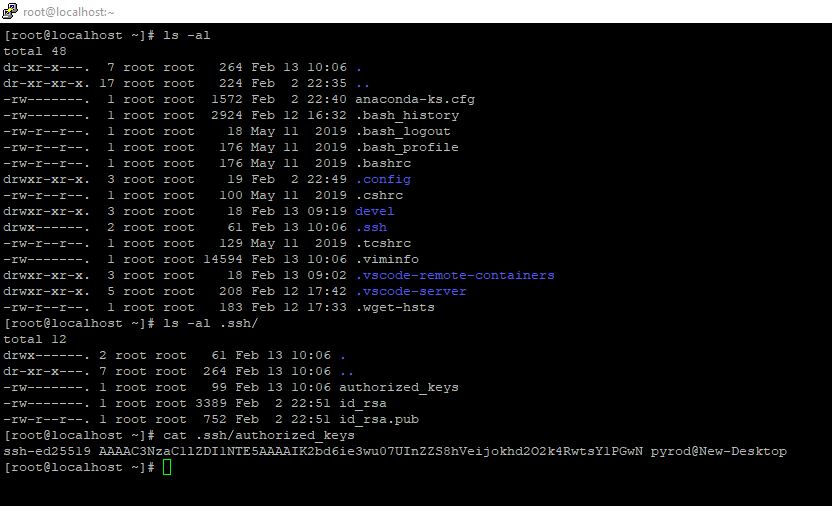
Now that I have keys, I need to install that public key into the Centos VM that I am running so that I can authenticate without needing the password. Go into the system and login as the user that you develop under. I personally use root. I know that it is absolutely the wrong thing to do and that there are risks associated with it, but this system is only used for development work and I hate having to type sudo before every single command so I just use root. If it doesn’t already exist, create a folder named .ssh within the user’s home directory and set the permissions to 700. Within there, create a file called authorized_keys and set its permissions to 600. Finally, edit the file you just created, and copy/paste the entire contents of the public key that you generated earlier.
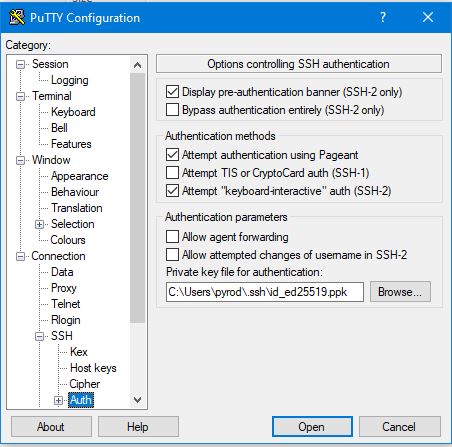
Now we can configure Putty. On the Windows host, open Putty. Under the host name/IP address box enter dev.local. On the left side, drop down the boxes until you get to Connections > SSH > Auth. In the Private key file box, select the .ppk version of the private key that you exported a minute ago. After that, go back to the session screen and save this so you don’t have to do it again. Now try and connect. You may have to accept the SSH key the first time, and you’ll still need to type in the username, but no need for a password anymore.
VSCode
The last thing that we’re going to do is get VSCode to connect to the dev system. VSCode is an open-source project run by Microsoft that is a complete IDE. It supports a huge number of languages, debugging, and lots of other things. It has a huge number of plugins available so you can get support for just about anything you can think of. I install VSCode on my Windows system and then have it remotely connect to the dev system through SSH. Under the plugins window, install the Remote Development plugin. This can be used to connect to your Centos box and a few other features I will (hopefully) get working in another article. Once it’s installed go to View > Command Palette > Remote-SSH: Add New SSH Host. When it prompts you, you’ll enter the username@hostname (i.e. root@dev.local). Now go to View > Command Palette > Remote-SSH: Connect to Host. If all goes well, you should NOT get a prompt for a username or password and the bottom left corner of the screen should show a green box that shows you’re connected to dev.local.
OK, that’s it for this post.
Credits
- Dev Ops: Kharnagy | CC BY-SA 4.0 International